HL | How to Create an API Key on Hyperliquid
Important Note for US & UK users: Please ensure you have activated your VPN & set the location to Sydney, Australia, prior to logging onto the Hyperliquid website.
- Ensure you're logged onto https://app.hyperliquid.xyz/trade & you've connected the wallet you intend to link via API.
- Click on 'More'
- Click on 'API'

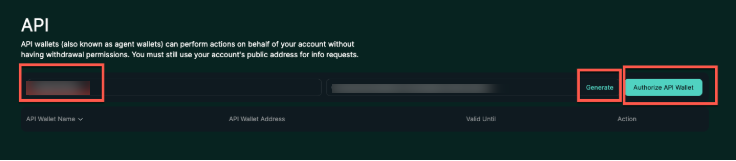
- You should now see the screen below
Note: If you see an API entry already in the list entered as app.hyperliquid.xyz, this is normal - please proceed with the steps.

- Type a name for your API key in the first box (this can be anything you like e.g. YFM Bot 1)
- Click on 'Generate'
- Click on 'Authorise API Wallet'
Note: When you click on 'Generate', the API wallet address will not match your actual wallet address - this is normal.
- Click on 'Max' next to 'Days Valid' (this should set it to 180 days).
- Copy your master wallet address

- Paste it into Claude when ready
- Click on the 'Copy' icon next to your Private Key

- Paste your Private key into Claude when instructed
Note: Do not save your Hyperliquid API Private Key anywhere. If you have created it too early and can no longer view the private key, you can simply delete the API key and create a new one.
- Navigate back to the tab with your Hyperliquid account.
- Click on 'Authorize'

- Click on 'Confirm'
Note: This confirmation screen may look different based on which device you're using to connect to Hyperliquid. If you're using a harware wallet, please ensure that you have the relevant app open (Eg. Ledger Wallet, Trezor Suite, etc..). You may be required to sign for the request on your hardware device, or on a different browser wallet (eg Rabby).

- Follow the prompts so that all confirmations have been processed.
- Once confirmed, you should now see a new API key generated in the list
